Adding a realistic drop shadow to any object would give your image a realistic view. Do you know how to create a realistic drop shadow using photoshop? It’s not that tough. In this article, it will be explained step by step. We are going to show how to create a drop shadow and also make it realistic. A drop shadow can make your photograph more realistic and can illustrate the depth of an image.
Photoshop is the world’s no1 photo editing, graphics designing, and image creation software of Adobe. It is probably an easier software for this kind of work with many facilities. Using Photoshop, you can edit your photos and give them a new and better look. In photoshop, with expertise and skills, you can make the image look more realistic and better. Creating a drop realistic shadow is one of the coolest things you can do in photoshop.
You will learn how to use the settings in the Layer Styles and Opacity options bar as well as blending modes to achieve the whole procedure of this needs time and skills, we are going to demonstrate the whole process step by step.
The photograph may be your image or a product image but creating a drop shadow will make it more realistic.
How Do You Create a Realistic Drop Shadow in Photoshop
The procedure is a little long and needs time. The whole procedure will be described step by step below:
Open the Particular Image in Photoshop
First, open Photoshop and then open the image in which you want to create a realistic drop shadow. To open the image click >File from the menu bar the click >open. Then your image will appear.
Remove Background and Isolate the Object
Once the image is open in a new file, open the layers palette from Window > Layers. Then cut out the object and place it in a new layer. It will isolate the object from the background. Take a name to this new layer which will make it easy for you to identify the layers. You can make the background visible by clicking the icon next to the background layer.
Create a New Background Behind the Isolated Object
In the layer palette, select the hidden background layer and then go to Layer > New Layer. You can also type keyboard commands for creating a new layer, SHIFT+CONTROL+N (SHIFT+COMMAND+N) on a Mac. Filling the new background with color will be better. Go to Edit > Fill. Choose a color from the dropdown menu. Besides, you can also customize colors.
Create a Drop Shadow
Select the isolated object layer. After that, click the fx button located at the bottom of the layer palette. Then select Drop Shadow. It will then pop up the Drop Shadow dialogue box. Create a drop shadow adjusting the color. There is no need to adjust opacity, distance, size, etc. right now you can do that later. After adjusting the drop shadow settings click OK.
Create a Layer for the Drop Shadow and Separate It from the Object Layer
Click Layer then Layer Style and then Create Layer. Thus you can separate the shadow from the object layer. This will help you to work with the shadow independently. A warning may appear on the screen asking whether you want to create a layer or not. If so, click OK. Name this layer as “Drop Shadow Layer” to make it easy to work. You can modify the shadow from the new layer.
Distorting the Drop Shadow
From the layer palette, select the newly created Drop Shadow Layer. Then click Edit > Transform > Distort. This will allow you to pull your drop shadow down to the floor.
Now you have to adjust the size, angle, curve, and other stuff of the shadow. To make it more realistic, you will need artistic knowledge and see what and how the shadow suits.
First, make sure which direction the shadow will fall from your object. Remember to keep the vanishing point of your image in mind while you are determining how far your shadow should be distorted. You can select a certain part of your shadow and modify it accordingly.
You have to make sure that the shadow is connected to all parts of the object that are touching the floor. To adjust it, set the blending mode of the shadow layer to normal and fill to 100%. Use the Rectangular Marquee Tool to select the area you want to modify. Then again go to Edit > Transform > Distort to edit that particular portion of the shadow.
Then apply Transformation and use the Paintbrush and Eraser tool to fix the edges of your shadow. After that, change the blending mode of the drop shadow layer. Change it back to “Multiple” and reduce the fill to 75%.
Creating an Alpha Channel
After following all the steps mentioned before, the shadow will start to look realistic. But in real life, you may see that shadow become lighter and blurrier the further it moves from the object. So you have to follow this to make your shadow look more realistic. Using an alpha channel is the best way to do this. It will help you to control the blurriness and lightness of a certain area of the shadow.
Creating an alpha channel is easy. Go to Windows > Channels which will open the channel palette. Select New Channel from the Channels Palette. Keep the default name “Alpha 1”. Make sure that the “Selected Area” button is chosen.
Create Gradient within the Alpha Channel
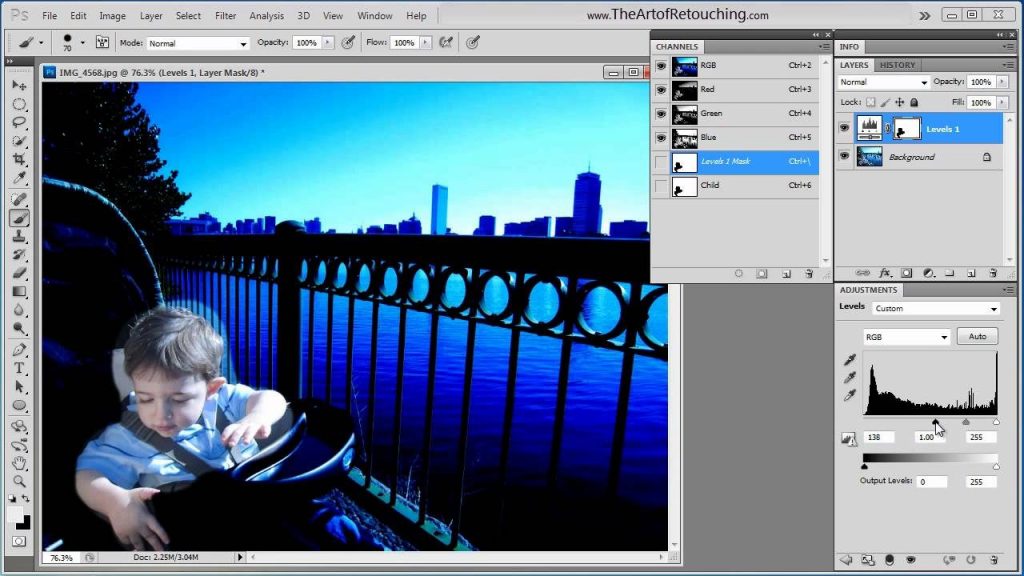
Select the new Alpha 1 channel from the channel palette. Ensure that the eye icon to the left of the channel name is toggled on. Select Gradient Tool from the Tool Palette. Also, don’t forget to set the foreground to black and the background to white. Set the gradient to black-to-white and gradient type to linear.
After correcting the gradient settings, place the cursor at the furthest point of your shadow and draw the gradient line to the closest shadow part to the object. The gradient will be visible as a red line.
Selection of Blur
After creating the gradient, you will see a red gradient on top of your image. It will indicate how the mask within the channel interacts. If the red gradient is distracting you, you can toggle the eye icon to make it invisible.
To select the color channel and deselect the alpha channel, go to the channel palette and click on the top channel.
Go to the layer palette and recheck if you still have the shadow layer selected. You can simply adjust blur by going to Filter > Blur > Lens Blur.
Check the box next to “Preview”. Select Alpha from the drop-down menu under the Depth Map. Blur focal distance should be kept at 0 and radius to a high number. Make the box next to Invert checked. Then click OK
Layer Mask Creating
Click Select > Load Selection and choose Alpha 1 from the drop-down channel menu. Don’t forget to check the radio button next to New Selection. Click OK.
A selection in the darkest areas of the gradient created in the alpha channel will be seen.
Then go to Select > Select Inverse or type SHIFT+CONTROL+I (SHIFT+COMMAND+I on a Mac).
Next, go to Layers Palette and tap on the Layer Mask icon. As the mask is applied, you will see the shadow fade the further it recedes.
Cleaning up Shadows and Making Sure the Appearance is Perfect
You have to make sure that no portion of your shadow is wrongly placed. Use the Eraser Tool to remove any unnecessary part of the shadow. Give it a last check that angle, size, opacity, sharpness, and other things of the shadow are perfect. In fine, check that it is looking realistic to you.
Conclusion
Throughout the article, we tried to demonstrate how to create a realistic drop shadow in photoshop. Adding a drop shadow to your e-commerce product can increase its value. It will look more realistic as this shadow will take the image to a whole new dimension.
In terms of a person’s image creating a drop shadow will make it look more classy and realistic. It needs a good artistic vision and skills to make the shadow look better. As there is a saying ” Practice Makes a Man Better”, you will gain skills and get better at editing images.