You can turn a simple photo into a vivid memory by capturing the fleeting light of sparklers. And you no longer need fancy equipment; your iPhone is all you need. With the right techniques and a few simple tips, you can capture high-quality sparkler photos using just your iPhone.
Prepare your iPhone by ensuring it’s charged and has enough storage. Turning on specific settings, like Live Photo mode, can greatly improve photo quality by capturing the motion of the sparklers.
For those who want more control, taking manual command over shutter speed and ISO settings allows for precise results. Using a tripod can be helpful for stability, and choosing the right environment plays a crucial role in the final outcome.
Capturing the bright streaks of a sparkler in motion can be done by using a combination of long exposure and careful timing. Even beginners can enjoy the creative process and end up with stunning photos to share or keep as personal treasures.
In this article, we’ll explore these simple steps in detail.
Most Important Things To Consider First
1. Safety First When Creating Sparkler Pictures
When photographing with sparklers, prioritize safety, especially around children to avoid accidents.
Ensure your safety by wearing protective gear and handling sparklers with care to prevent burns or mishaps.
2. Stability is Key
In regular photography, a steady hand helps capture clear images.
For long exposure shots needed to capture sparkler trails, even slight movement can blur the picture.
Using a tripod stabilizes your phone, ensuring sharp, well-defined photos.
How to Take Good Sparkler Pictures With iPhone
Here’s how you can take stunning sparkler photos with your iPhone.
Choose the Right Sparklers
Taking great sparkler photos with your iPhone starts with selecting the right sparklers. Opt for ones with longer burn times to capture extended light trails. Ensure they emit enough brightness to stand out in your photos and consider using longer sparklers for more impressive visual effects.
Set Up Your Environment
Creating the perfect environment is crucial for capturing stunning sparkler photos. Choose a dark or low-light setting to enhance the glow of the sparkler. Avoid windy conditions that can cause flickering and result in blurry trails. Plan the layout and positioning of your subjects and props carefully to compose a visually appealing shot.
Get Your iPhone Ready
Prepare your iPhone before shooting to ensure optimal performance. Clean the lens to avoid smudges or blurriness. Fully charge the battery to prevent interruptions during your shoot. Update your iPhone’s software to access the latest camera features and improvements.
What camera settings for sparklers?
Adjust your camera settings to capture the brilliance of sparklers effectively. Control light input by adjusting exposure settings. Use manual mode for precise control over shutter speed, crucial for capturing light trails. Set ISO to a low number to minimize graininess in low-light conditions.
Use a Tripod to Take Stable Pictures
Stability is key for clear, sharp sparkler photos, especially with longer exposure times. Use a tripod to keep your iPhone steady and reduce the camera shake. This stability ensures clearer images, particularly in low-light settings where details are crucial.
You Must Frame Your Shot
Frame your sparkler photos thoughtfully to create visually appealing compositions. Use the rule of thirds to balance your subjects and light trails. Position the sparkler creatively within the frame, ensuring the background complements its visual effects.
You Should Take Multiple Photos
Increase your chances of capturing the perfect shot by taking multiple photos from different angles and with varied movements. Experiment with timing to achieve different effects, capturing the dynamic motion and light trails of the sparkler.
Use Burst Mode
Utilize Burst Mode on your iPhone to capture rapid sequences of photos, ideal for dynamic subjects like sparkler trails. This mode increases your chances of capturing expressive moments and ensures you have several options to choose from.
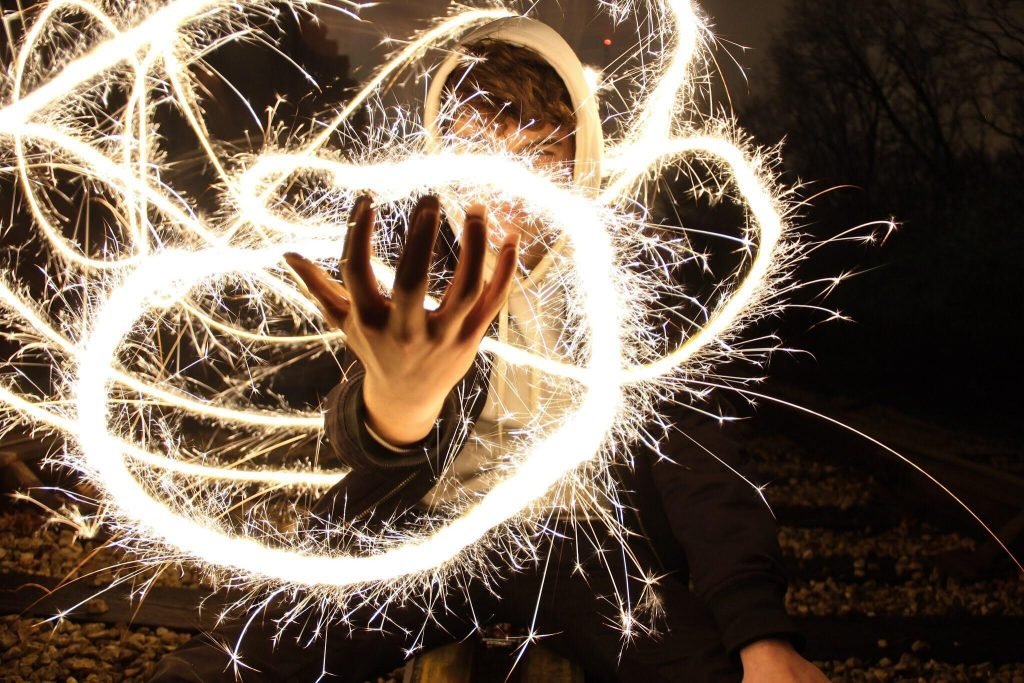
Experiment with Light Trails
Enhance your sparkler photography by experimenting with light trails. Move the sparkler to create shapes or write words in the air, capturing unique patterns. Use long exposure techniques to capture intricate light patterns and explore different movements for varied visual effects.
Incorporate Props and People
Add interest and context to your sparkler photos by including props and people. Incorporate subjects holding sparklers to add a human element. Experiment with props like fairy lights or reflective surfaces to enhance visual appeal and capture candid moments for lively, dynamic shots.
Try third-party apps
Enhance your iPhone’s camera capabilities with third-party apps offering manual controls and special features for long-exposure photography. Explore different filters and creative tools within these apps to add style and mood to your sparkler photos.
Edit Your Photos
After capturing your sparkler photos, enhance them further through editing. Adjust brightness and contrast levels to clarify details and enhance vibrancy. Apply filters to create specific atmospheres that complement your photos’ themes. Crop and fine-tune your photos to refine compositions and highlight the most compelling aspects of your sparkler photography.
Recommended Camera Settings For Capturing Sparkler Pictures With An iPhone
| Setting | Recommended Value |
| Exposure | -1 to -2 EV (underexposed to avoid overexposure) |
| ISO | 100-400 (low to minimize noise) |
| Shutter Speed | 1 to 4 seconds (for long exposure to capture light trails) |
| Focus | Manual (lock focus on the sparkler) |
| White Balance | 5000-5500K (to maintain the natural color of the sparkler light) |
| Burst Mode | Enabled (hold the shutter button to capture multiple frames) |
| HDR | Off (to prevent ghosting effects from moving sparklers) |
How Do You Do A Sparkler Effect?
The sparkler effect revolves around capturing the trails of light produced by moving sparklers. These trails create dynamic and artistic patterns in your photos, adding a magical and festive touch to your images.
Long-exposure photography is crucial for capturing the movement and light trails effectively. It allows your iPhone’s camera sensor to collect light over a longer period, resulting in beautifully elongated sparkler trails in your photos.
To ensure sharp and clear long-exposure shots, it’s essential to keep your iPhone steady during the exposure. Use a tripod or stabilize your iPhone on a stable surface to minimize camera shake. This stability is key to achieving crisp images while capturing the intricate light patterns created by the sparklers.
Does the iPhone Have A Long Exposure Feature?
No, iPhones do not have a native long exposure feature built into the default Camera app. However, you can achieve long exposure effects using third-party camera apps available on the App Store. Like Slow Shutter Cam or Camera+.
These apps utilize techniques like capturing multiple frames and merging them to simulate long exposure, allowing you to capture light trails, smooth water effects, and other dynamic motion blur effects.
When Should You Use Long Exposure On Your iPhone?
As iPhone camera doesn’t have a built-in Long Exposure Feature. However, you can benefit from this feature by using third-party apps. In that case, you should use long exposure on your iPhone to capture sparkler photos in the following situations:
Capturing Light Trails
Long exposure is perfect for capturing the light trails produced by sparklers as they move through the air. It allows you to extend the exposure time, creating beautiful, streaking lines of light in your photos.
Creating Dynamic Effects
Long exposure enhances the visual impact of sparkler photos by emphasizing the motion and patterns created by the sparkler’s light. This technique adds a sense of drama and excitement to your images.
Enhancing Nighttime Photography
In low-light conditions, long exposure helps capture the glow and ambient light surrounding the sparklers more effectively. It allows for clearer, more vibrant photos without overexposing the bright areas of the sparkler.
Highlighting Creative Movements
Use long exposure to experiment with different movements of the sparkler, such as writing words or creating shapes in the air. This technique can turn simple sparkler photography into a creative and artistic endeavor.
Where Can I Buy The Sparkle Filter?
Check major online platforms like Amazon or eBay. They often have a variety of sparkle filters compatible with iPhone cameras available for purchase.
You can visit local photography stores or online websites that specialize in camera accessories. These stores usually carry a range of filters and accessories that can enhance your photography, including sparkle filters.
Consider digital sparkle filter apps that can be downloaded and used during photo editing. These apps allow you to add sparkle effects to your photos after they have been taken, providing flexibility and creative control.
How Do You Do Long-Exposure Sparklers Shots?
To capture long-exposure sparkler shots with your iPhone, follow these steps:
Set Up Your iPhone on a Tripod
Stability is crucial for clear long-exposure shots. Use a tripod to keep your iPhone steady throughout the exposure, minimizing any camera shake that could blur the image.
Use a Third-Party App for Exposure Control
Since iPhones do not have a native long exposure feature, use a third-party camera app like Slow Shutter Cam or Camera+ that allows you to adjust the exposure time. Set the exposure time typically between 1 to 4 seconds to capture the light trails effectively.
Lighting and Moving the Sparkler
Light the sparkler and begin moving it in patterns or shapes while the long exposure is active. The extended exposure time will capture the movement of the sparkler as streaks or trails of light against the dark background.
Conclusion
Creating sparkler photos is a delightful experience, and the fun doesn’t have to stop once you’ve captured the initial shot. Afterward, you can dive into post-editing to fine-tune the images according to your personal preferences.
Your iPhone is more than capable of delivering excellent picture results for your sparkler photography. Experiment with different settings and lighting conditions to add a touch of sparkle to various occasions.
Above all, prioritize safety throughout the photography process. Ensure that everyone involved, especially children, handles sparklers safely to prevent accidents.
I’m Muhammad, not just a writer. You can call me “Wordsmith of Infozone24.com”.
Truely, I enjoy writing blogs for people. Doing this since 2015 on a variety of topics.
My research skills are honed through years of academic publications and investigative journalism. They fuel my quest for knowledge.
I am nearing completion of my Master’s degree in Information Science. It is just another step in this lifelong journey.
Beyond credentials, my true compass is the joy of learning. My mission is simple: to make information accessible, engaging, and helpful for people.
I have publications on many authoritive websites like Zolo.ca.